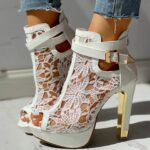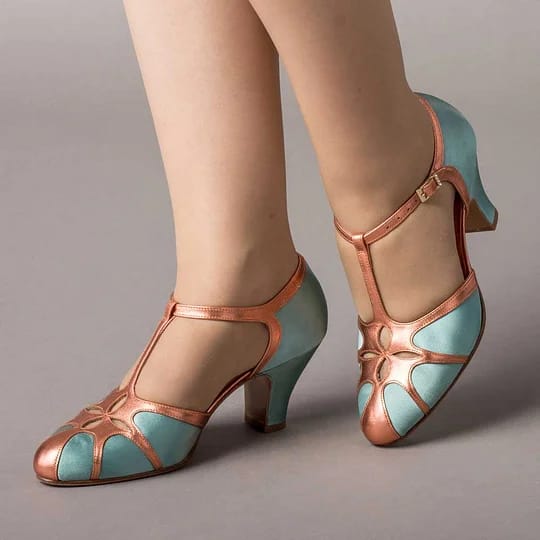
T-strap heels captivate with their vintage elegance and Art Deco charm, featuring distinctive straps that form “T” shapes across the instep while providing exceptional foot security. Yet these beautiful shoes frequently cause fit frustrations that send women limping home from events, stuffing gorgeous heels back into closets after single wears, or abandoning online purchases due to painful pressure points and slippage issues. Understanding the unique challenges T-strap heel construction presents—from strap placement that varies by foot shape to buckle adjustments that make or break comfort, from arch support considerations to the delicate balance between security and circulation—transforms these potentially problematic shoes into comfortable, wearable favorites. This comprehensive guide identifies the seven most common T-strap heel fit problems women encounter, explains why each issue occurs, and provides detailed solutions including sizing strategies, break-in techniques, product recommendations, and professional alterations that ensure your T-strap heels fit perfectly and feel comfortable from first wear through countless elegant occasions.
Understanding T-Strap Heel Construction
What makes T-straps unique:
- Vertical strap running from toe to ankle
- Horizontal strap across instep
- Creates “T” shape securing foot
- Usually features buckle or button closure
- Provides superior stability compared to pumps
Why fit matters more with T-straps: Multiple strap contact points mean multiple potential problem areas. Unlike simple pumps where fit issues concentrate at heel and toe, T-strap heels can create discomfort across instep, ankle, and foot arch simultaneously.
Problem #1: Strap Cutting Into Instep
The Issue
The horizontal instep strap digs painfully into the top of your foot, creating red marks, discomfort, or even bruising after wearing. This ranks as the most common T-strap complaint.
Why this happens:
- Strap positioned at high-pressure point on foot
- Shoe sized too small overall
- Strap material too stiff or narrow
- Buckle adjusted too tightly
- High instep foot shape in standard-width strap shoes
Solutions
Immediate fixes:
1. Adjust buckle tension:
- Loosen strap by one hole
- Should feel snug but not tight
- Test: Slide finger under strap (slight resistance = correct)
2. Add cushioning:
- Gel strap cushions: Thin gel pads that adhere under straps ($5-15)
- Moleskin: Cut to size, place under strap pressure points ($3-8)
- Band-aids: Emergency solution for single event
3. Targeted stretching:
- Wear thick socks with shoes at home
- Use blow dryer on strap area while wearing (leather only)
- Professional cobbler stretching ($15-30)
Long-term solutions:
4. Choose wider straps:
- Wider straps distribute pressure across larger area
- Look for 1/2 inch or wider instep straps
- Avoid very thin, delicate straps if you have high instep
5. Select adjustable designs:
- Multiple buckle holes allow customization
- Elastic insert straps offer flexibility
- Try before buying, walk around store
6. Consider foot shape:
- High instep? Choose T-straps with generous strap placement
- Flat instep? Standard straps usually work fine
Prevention: Order half size up if between sizes and you have high instep. Better slightly loose than painfully tight.
Problem #2: Ankle Strap Slipping Down
The Issue
The ankle strap gradually slides down your heel during wear, causing the entire shoe to loosen and potentially slip off your foot.
Why this happens:
- Ankle strap positioned too high initially
- Strap too loose (over-adjusted for comfort)
- Narrow or small ankles in standard-width straps
- Smooth hosiery or tights reducing friction
- Walking motion gradually working strap downward
Solutions
Immediate fixes:
1. Tighten properly:
- Ankle strap should sit just above ankle bone
- Adjust one hole tighter than feels necessary initially
- Straps may loosen slightly with movement
2. Add grip:
- Clear heel grips: Adhesive strips inside heel counter ($5-12)
- Ankle strap cushions: Prevent slipping while adding comfort ($8-15)
- Fashion tape: Double-sided tape secures strap to ankle temporarily ($6-10)
3. Adjust wearing angle:
- Ensure strap sits in natural ankle groove
- Position before buckling, check in mirror
- May need to unbuckle and reposition during first wear
Long-term solutions:
4. Choose better strap placement:
- Look for straps that hit just above ankle bone naturally
- Try different brands (strap placement varies)
- Avoid straps positioned too high up ankle
5. Seek adjustable closures:
- Multiple buckle holes crucial for narrow ankles
- Elastic insert versions adapt to ankle size
- Velcro closures offer infinite adjustability (less elegant but functional)
6. Professional alterations:
- Cobbler can add extra buckle holes ($10-20)
- Strap can be shortened if excessively long ($20-40)
Prevention: When trying on, walk around store for 5-10 minutes to test strap stability before purchasing.
Problem #3: Toe Box Too Tight or Narrow
The Issue
Your toes feel cramped, pinched, or squeezed in the toe box, causing numbness, pain, or blisters despite the straps fitting correctly.
Why this happens:
- T-strap often features pointed or narrow toe boxes (vintage style)
- Sized for strap fit but toe box runs small
- Wide or spreading toes in narrow-lasted shoes
- Swelling during day makes initially-fine fit uncomfortable
Solutions
Immediate fixes:
1. Toe stretching:
- Insert shoe stretchers overnight (adjustable, $15-30)
- Focus on toe box area specifically
- Professional cobbler stretching more effective ($20-40)
2. Toe protection:
- Gel toe caps: Protect and cushion toes ($8-15)
- Toe spacers: Prevent toe overlap ($6-12)
- Cushioned insoles: May provide slight additional room ($10-25)
3. Size assessment:
- If toes touch front when standing, size up
- Half size larger may solve without affecting strap fit
- Width options (if available) can solve toe pinching
Long-term solutions:
4. Choose rounder toe boxes:
- Almond or rounded toe T-straps over extremely pointed
- Peep toe versions offer more toe room
- Check toe box shape before purchasing
5. Brand research:
- Some brands run wider/narrower
- Read reviews specifically mentioning toe box fit
- Try multiple brands to find your best match
6. Timing matters:
- Shop for shoes late afternoon when feet slightly swollen
- Ensures fit accommodates natural daily foot expansion
Prevention: Always stand and walk in potential purchases. Sitting fit is not wearing fit.
Problem #4: Heel Slippage Despite Secure Straps
The Issue
Your heel slides up and down in the shoe with each step despite the T-straps being properly adjusted, causing blisters and instability.
Why this happens:
- Heel counter too wide or shallow for your heel shape
- Overall shoe sized too large (compensating for tight straps)
- Heel shape doesn’t match shoe’s heel cup design
- Smooth hosiery reducing friction
Solutions
Immediate fixes:
1. Heel grips:
- Adhesive heel liners: Stick inside heel counter ($5-12 per pair)
- Full insoles with heel cup: Raises foot slightly, improves fit ($12-25)
- Tongue pads: Add volume under instep if that’s causing slip ($6-10)
2. Better hosiery:
- Skip silky tights that encourage slipping
- Footies or no-show socks provide grip (invisible with T-straps)
- Bare feet often grip better than hosiery
3. Layered solutions:
- Combine heel grips with slight strap tightening
- May need multiple thin inserts rather than one thick one
Long-term solutions:
4. Correct sizing:
- Heel slippage often indicates shoes too large overall
- Try half size down if toes have room
- Better slightly snug initially (leather stretches)
5. Seek better heel counter design:
- Some brands have deeper, more secure heel cups
- Higher heel counters prevent slippage better
- Try different brands/styles
6. Consider heel height:
- Lower heels generally slip less
- Very high heels (4+ inches) encourage forward foot slide
Prevention: Proper fit should feel snug (not tight) with minimal heel movement when new.
Problem #5: Strap Buckles Causing Pain or Irritation
The Issue
Metal buckles, prongs, or hardware rub against your foot or ankle, causing pain, scratching, or catching on hosiery.
Why this happens:
- Buckle positioned against sensitive skin
- Metal directly contacting foot without padding
- Poorly finished hardware with rough edges
- Buckle too large or protruding for foot placement
Solutions
Immediate fixes:
1. Add padding:
- Moleskin over buckle: Cut small piece to cover buckle back ($3-8)
- Adhesive foam: Cushion between buckle and skin ($4-10)
- Band-aid as buffer: Emergency solution
2. Adjust positioning:
- Rotate buckle slightly to avoid pressure point
- May need to make new buckle hole for better placement
- Ensure prong faces away from ankle bone
3. Cover with clothing:
- Ankle socks or footies create barrier
- Fashion tights provide protection layer
Long-term solutions:
4. Choose padded strap designs:
- Some T-straps have cushioning behind buckle
- Fabric-covered buckles less abrasive
- Rounded hardware over sharp rectangular
5. Professional modification:
- Cobbler can add padding permanently ($15-25)
- Replace harsh buckle with gentler design ($25-50)
- Reposition buckle location ($20-40)
6. Select better hardware:
- Button closures gentler than buckles
- Elastic straps with hooks avoid hardware entirely
- Quality finishing prevents sharp edges
Prevention: Examine buckle finish before purchasing. Rough edges indicate poor quality likely to cause problems.
Problem #6: Arch Pain from Strap Pressure
The Issue
The vertical or horizontal strap puts pressure on your arch, causing pain that worsens throughout wear.
Why this happens:
- High arches with strap crossing at wrong point
- Lack of arch support in shoe bed
- Strap pulling foot down into unsupportive sole
- Combination of heel height and strap tension compressing arch
Solutions
Immediate fixes:
1. Add arch support:
- 3/4 length orthotic insoles: Support arch without affecting fit ($15-40)
- Arch support cushions: Adhesive gel supports ($8-15)
- Custom orthotics: For severe issues (prescription, $200-500)
2. Adjust strap tension:
- Slightly looser may relieve arch pressure
- Experiment with different buckle holes
- Balance between support and compression
3. Limit wearing time:
- Start with 1-2 hours, build tolerance
- Take breaks during events to relieve pressure
- Bring backup flats for long occasions
Long-term solutions:
4. Choose lower heels:
- Higher heels increase pressure on forefoot and arch
- 2-3 inch heels more manageable than 4+ inches
- Platform versions reduce effective heel pitch
5. Seek built-in arch support:
- Some brands incorporate arch support in design
- Cork footbeds offer natural support
- Avoid completely flat, unsupportive soles
6. Professional assessment:
- Podiatrist can identify specific arch issues
- Custom modifications possible for special shoes
- May recommend specific brands/styles for your feet
Prevention: If you have high arches or arch pain generally, try shoes in-store with extended walking before committing.
Problem #7: Overall Fit Issues (Too Large or Small)
The Issue
The entire shoe feels wrong—either too tight everywhere or too loose despite strap adjustment, making the shoes unwearable.
Why this happens:
- Incorrect size selection
- T-strap sizing differs from your usual size
- Brand runs large or small
- Foot shape incompatible with last design
Solutions
Size assessment guide:
| Symptom | Likely Issue | Solution |
|---|---|---|
| Toes touching front standing | Too small | Size up half size |
| Heel slipping significantly | Too large | Size down half size |
| Straps won’t buckle comfortably | Too small | Size up or try wide width |
| Straps at tightest setting still loose | Too large | Size down or try narrow width |
| Foot slides forward painfully | Too large or heel too high | Size down or lower heel height |
| Cannot walk without pain anywhere | Wrong size or shape | Try different brand/style |
Sizing strategies:
1. Know your measurements:
- Get professionally measured (sizes change over time)
- Measure both feet (use larger size)
- Measure late afternoon when feet slightly swollen
2. Research brand sizing:
- Read reviews about sizing (runs large/small/true)
- Check brand size charts (European sizes vary)
- Order multiple sizes if buying online
3. Width matters:
- Medium (B) width most common
- Wide (C/D) available in some brands
- Narrow (AA) harder to find but exists
4. Return policies:
- Know return window before removing tags
- Wear briefly indoors to test fit
- Document fit issues with photos if needed
Prevention: Never assume your standard size fits all brands. Always verify sizing specific to each manufacturer.
Quick Reference: Fit Problem Diagnosis
If you experience: → Likely cause: → First try:
- Red marks on instep → Strap too tight → Loosen buckle one hole
- Strap sliding down → Too loose or narrow ankle → Tighten and add grip pads
- Toe pain → Toe box too narrow → Toe stretcher or size up
- Heel slipping → Shoe too large → Heel grips or size down
- Buckle rubbing → Hardware placement → Add moleskin padding
- Arch pain → Lack of support → Arch support inserts
- General discomfort → Wrong size → Reassess size entirely
Essential Products for T-Strap Comfort
| Product | Purpose | Price Range | Effectiveness |
|---|---|---|---|
| Gel strap cushions | Prevent strap cutting | $8-15 | High |
| Heel grips | Stop heel slippage | $5-12 | High |
| Shoe stretcher | Widen toe box or overall fit | $15-30 | Medium-High |
| Arch support insoles | Relieve arch pressure | $15-40 | High |
| Moleskin | Multi-use padding | $3-8 | Medium |
| Fashion tape | Secure straps temporarily | $6-10 | Medium |
| Toe spacers | Prevent toe crowding | $6-12 | Medium |
| Professional stretching | Expert shoe modification | $20-50 | Very High |
Break-In Timeline for T-Strap Heels
Day 1-3: Wear 30-60 minutes around house with thick socks Day 4-7: Wear 1-2 hours for short outings (grocery store, errands) Week 2: Wear 2-4 hours for longer events (dinner, social gatherings) Week 3+: Gradually increase to full-event wear
Never: Wear brand new T-straps to all-day event or special occasion without breaking in first.
When to Seek Professional Help
Visit a cobbler if:
- DIY solutions don’t resolve issues after multiple attempts
- Expensive designer shoes worth professional investment
- Structural issues need expert modification
- Strap placement requires repositioning
- Custom padding or stretching needed
Typical cobbler services:
- Shoe stretching (overall or specific areas): $20-50
- Adding buckle holes: $10-20
- Padding installation: $15-30
- Strap shortening or lengthening: $25-50
- Heel height adjustment: $30-60
Prevention Checklist Before Buying T-Strap Heels
✓ Measure feet professionally within past year ✓ Shop late afternoon when feet slightly swollen ✓ Research brand sizing reviews ✓ Try on with intended hosiery/socks ✓ Stand and walk minimum 5 minutes in-store ✓ Test strap adjustability at different holes ✓ Check buckle smoothness and positioning ✓ Verify toe box has adequate room ✓ Assess heel counter security ✓ Examine strap width and placement ✓ Consider heel height relative to comfort level ✓ Understand return policy before purchasing
Conclusion: Achieving Perfect T-Strap Fit
T-strap heels offer unmatched vintage elegance and foot security when properly fitted, but their multi-strap construction creates unique challenges requiring attention and often creative solutions. By understanding the seven most common fit problems—strap cutting, ankle slipping, toe cramping, heel slippage, buckle irritation, arch pressure, and overall sizing issues—you can diagnose problems quickly and apply appropriate fixes ranging from simple pad additions to professional alterations.
Remember that perfect fit combines proper sizing, strategic product use, adequate break-in time, and realistic expectations about heel comfort. Not every T-strap will work for every foot, regardless of solutions attempted. If multiple fixes fail, the shoe may simply be incompatible with your foot shape, and finding a better-suited style or brand is the wisest choice.
With this comprehensive guide to T-strap fit problems and solutions, you’re equipped to troubleshoot issues, make informed purchasing decisions, and transform potentially problematic vintage-style heels into comfortable, wearable favorites that carry you elegantly through countless occasions. Step confidently into T-strap style knowing you have the knowledge to achieve and maintain comfortable, secure fit.