In busy commercial kitchens, the fryer is a workhorse, turning out crispy favorites that keep guests happy. But behind the sizzle is a big challenge: managing fry oil. The goal isn’t just great-tasting food; it’s doing it in a way that saves money and reduces waste, especially with rising oil prices.
Smart fry-oil management helps oil last longer, protects profits, and keeps food quality high. Curious what you could save? You can try Frylow at no cost and see the results firsthand.
Making oil last longer isn’t only a budget move; it touches the whole kitchen-cost control, eco-friendly practices, and consistent food quality and safety. Teams that stick with these habits save money even when oil pricing swings up and down.
With the right approach, oil becomes a managed asset instead of a constant expense, proving that efficient habits are at the core of a successful, sustainable kitchen.
Why Fry-Oil Conservation Is Critical in Busy Commercial Kitchens
Fry oil is more than an ingredient; it’s central to many menus, so managing it well matters. Fryers run for long stretches to meet demand, and hot oil breaks down over time. Without a plan, costs rise, food quality drops, and the environment takes a hit.
Saving oil goes beyond short-term savings. It shows a commitment to running a tight ship, reducing waste, and keeping high standards in a competitive field. When you understand how oil is used and wasted, saving it becomes a must, not a nice-to-have.
Financial Impact of Oil Usage and Waste
Oil is one of the biggest ongoing costs in frying. With commodity prices-like soybean oil-up by a lot, wasting oil gets expensive fast. Tossing oil too early wastes money. Taking steps to extend oil life cuts spending in real dollars. A good filtration setup alone can cut oil purchases by 50% or more over time.
Bad oil habits drain money in other ways too. Poor oil leads to off flavors and uneven cooking, which causes complaints and returns. Happy guests come back; returned plates don’t. Extra labor for frequent oil changes, cleaning, and handling adds cost as well. Smoother oil routines reduce labor needs, a big help when it’s hard to staff kitchens.
Environmental Benefits of Reducing Oil Consumption
Using less oil also helps the environment. If used oil is handled poorly, it can end up in landfills or waterways. Extending oil life and cutting usage reduces waste. Recycling used oil can also bring in revenue when it’s collected and turned into biodiesel.
Less oil used means fewer emissions from production and transport. Responsible handling and lower waste support CSR goals and resonate with guests who care about sustainability. In today’s food service, greener practices help businesses stay competitive while lowering their footprint.
Role of Oil Management in Food Quality and Safety
Food quality and safety depend on clean, well-kept oil. Food bits, burnt crumbs, and impurities break oil down and hurt flavor and texture, which is why programs designed to save fry-oil are so valuable. When oil goes bad, food can taste burnt or stale and may raise health concerns. Fresh, clean oil delivers the crispy texture and aroma people expect.
Accurate fryer controls and steady heat are key to predictable results. Regular filtration removes tiny particles and compounds that form when oil overheats or ages. Cleaner oil means better flavor, less smoke, and a safer workspace. Good handling and safe procedures reduce accidents and keep the line moving.
Main Factors That Shorten Fry-Oil Life
Even with great habits, oil breaks down over time. Some things speed this up and turn a usable product into costly waste. Knowing these “oil enemies” helps you target the right fixes and extend oil life.
Oil type, kitchen setup, cooking habits, and what you fry all affect how long oil lasts. When staff can spot warning signs and risky steps, they can protect the oil and the food.
Common Causes of Oil Degradation
Three core processes cause oil to wear out: Oxidation, Hydrolysis, and Polymerization. You’ll often see them tied to CHAMSS: Carbon, Heat, Air, Moisture, Salt, and Soap. Oxidation happens when oil meets air and turns stale, like chips left open. Heat speeds this up, especially above 300°F.
Hydrolysis happens when water in food meets hot oil, creating acidic byproducts that hurt taste. Frozen foods make this worse as ice melts straight into oil. Polymerization occurs as oil breaks apart and molecules stick together, leading to foaming and off flavors. Food particles feed this process. These forces work together and shorten oil life unless you manage them.
Foods and Procedures That Reduce Oil Longevity
Some foods and habits wear oil out fast. Heavily breaded items like chicken or fish shed lots of crumbs, which speed polymerization. Seasoning over the vat drops salt and spices right into the oil, pushing it to break down faster. Moisture from frozen foods drives hydrolysis, especially if items aren’t thawed correctly.
Kitchen routines matter too. Keeping fryers too hot during slow times stresses the oil. Filling baskets over the vat lets crumbs and ice fall in. Using soap in the fryer leaves residues that contaminate oil. These issues lead to faster breakdown and higher costs.
Indicators That Oil Needs Replacement
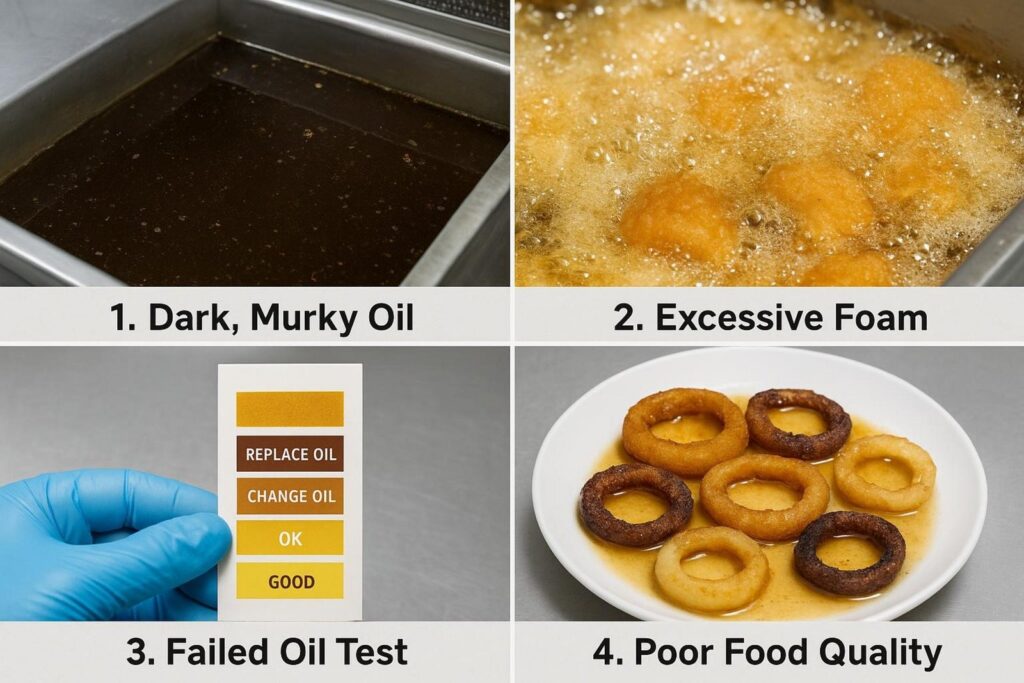
All oil wears out eventually. Knowing when to change it protects taste, safety, and workflow. Watch for these signs:
- Color: oil turns dark, murky, or cloudy
- Smell: burnt, fishy, or rancid odor
- Texture: sticky or thick feel (higher viscosity)
- Performance: food soaks up more oil, cooks unevenly, or tastes off
- Foaming: persistent surface foam during frying
Test strips give an objective read on oil quality and help pick the best change time so you swap oil based on data, not guesswork.
Best Practices to Increase Fry-Oil Longevity
There’s no magic trick here-just careful habits done every day. By targeting the key causes of breakdown, kitchens can keep oil usable longer, save money, and keep food consistent. This spans heat control, food prep, and daily upkeep.
It takes buy-in from the whole team. Small steps, repeated, make a big difference. These habits protect oil, lift food quality, and make better use of time and money.
Optimizing Fryer Temperature Settings
Heat is one of oil’s biggest enemies. Keep cooking temps steady: 350°F (175°C) is a common minimum, and 375°F (190°C) is a common high point during active frying. During slow periods, lower the set point-around 250-280°F-to slow breakdown.
Good controls help you hold steady temps so food cooks evenly. Staying on top of heat settings keeps oil stronger for longer and supports consistent results.
Managing Fryer Load for Efficient Oil Usage
How much food you drop at once matters. Overloading baskets crashes oil temperature, forcing the fryer to recover and stressing the oil. Underloading wastes energy. Aim for steady, repeatable batch sizes.
Prep helps too. Thaw frozen foods fully and pat them dry to keep water out of the oil. Fill baskets away from the vat and shake off loose crumbs. Season food away from the fryer to keep salt and spices out of the oil. These small changes add up to longer oil life.
Skimming and Filtering Oil During Service
Regular skimming and filtration keep oil clean. Crumbs and burnt bits fuel polymerization and speed breakdown. Skim the surface often with a fine mesh tool to pull out larger debris before it scorches.
Set a steady filtration routine-daily at minimum, and more often for heavy use or breaded items. Built-in or automatic systems make this safer and quicker and can even run during service. The aim is to remove particles before they damage the oil so it stays clear and lasts longer.
Minimizing Water, Starch, and Bread Crumb Contamination
Water, starch, and crumbs do real damage to oil. Keep water out by thawing completely and drying before frying. Don’t fill baskets over the vat, especially with frozen foods.
Starch and crumbs speed burning and breakdown. Skim and filter to remove them. Season away from the fryer so salt and spices don’t fall into the oil. Guarding against these contaminants helps oil stay cleaner and usable for longer.
Advanced Fry-Oil Filtration Strategies
Basic skimming is helpful, but advanced filtration takes oil care to the next level. Better tools and set schedules keep oil cleaner, cut costs, and support consistent food quality. Automation can bring precision and reduce risk and labor.
Investing in better filtration isn’t only about longer oil life. It also improves safety, supports steady output, and reduces waste. With the right gear and routine, you can keep oil cleaner for far longer.
Automated vs. Manual Filtration Systems: Pros and Cons
Kitchens usually pick between manual and automated filtration. Each option has trade-offs.
| Type | Pros | Cons |
| Manual (cones, portable filters) | Lower upfront cost; simple; okay for small volumes | Labor-heavy; slower; inconsistent results; misses fine particles; staff must handle hot oil, which raises safety risks |
| Automated/built-in | Cleaner oil with less labor; removes fine debris; safer; can run during service; lowers oil spend over time | Higher purchase cost; staff training needed |
Choosing Effective Filtration Equipment
Pick equipment that removes both big debris and tiny particles that speed breakdown. Use quality filter media like powders and pads that catch fine impurities better than basic screens.
Look for systems with multi-stage filtration. Think about your fry volume, the foods you cook (breaded items shed more crumbs), and staffing. Choose tools that are easy to run and maintain so the team uses them every time. The best setup is the one your team will actually use and keep in good shape, which leads to fewer oil changes and better food.
Scheduling Regular Filtration and Maintenance
A clear, steady schedule is the backbone of good oil care. Filter too soon and you waste time; too late and you waste oil. Frequency depends on how much and what you fry. Breaded items need more filtering. Use test strips and fryer logs to set a schedule that fits your kitchen.
Plan filtering during slower times or after service when oil has cooled. Automated systems can filter at set times. Clean the fryer vat on a routine basis, including the “cool zone” where debris collects. After cleaning, a water/vinegar rinse helps neutralize detergent so no residue stays behind. Following a steady routine keeps fryers performing well and stretches oil life.
Proper Storage and Handling of Fry-Oil
Good oil care starts before frying and continues after. Storage, transfers, and disposal all matter. Poor handling can contaminate oil, speed up breakdown, or cause injuries. Clear rules for storing, moving, and rotating oil protect quality and keep staff safe.
Below are simple steps to keep both fresh and used oil in good shape while keeping safety front and center. Protect oil from its “enemies,” and give staff the tools and know-how to handle it right.
Recommended Storage Conditions for Fry-Oil
Storage affects how long oil stays good. For fresh oil, use sealed, food-safe containers (stainless steel or food-grade plastic). Keep it away from air and sunlight. Air causes oxidation, and light speeds breakdown. Store at a steady, cool temperature. Limit air contact to slow staling.
For used oil you plan to reuse, store it in a cool, dark spot in sealed containers to keep air and debris out. Label containers with storage dates. Don’t keep used oil in open buckets, near heat, or in containers that look like food storage. Use secure, clearly marked, and ventilated areas-ideally outside or in a grease room-and keep lids closed to block pests and contamination.
Safe Procedures for Adding, Filtering, and Rotating Oil
Moving hot oil is one of the riskiest tasks in the kitchen. Staff must wear PPE: heat-resistant gloves, aprons, closed-toe slip-resistant shoes, and eye protection for high-risk steps. No PPE, no handling.
Use smart spouts or funnels to avoid spills when adding oil. Let oil cool before filtering-below 120°F is a good target. Use pump systems, caddies, or containers built for safe transport. Never lift full containers of hot oil by hand-use carts or mobile tanks. Clean drips and spills right away to prevent slips. Rotate oil so older batches are used first, but never beyond safe limits. These steps cut injuries, reduce waste, and keep service running smoothly.
Training Staff for Efficient Fry-Oil Management
Even great tools and storage routines only work if the team follows them. Training builds a culture of safety and care. In fast-paced kitchens, simple, safe, and clear oil routines help everyone work better, waste less, and keep food quality high.
Every employee should know how to handle hot oil, filter on schedule, and dispose of it correctly. Solid training leads to fewer mistakes, fewer injuries, and cleaner oil.
Teaching Oil Handling Safety and Procedures
Safety training for oil handling is a must. Hot oil can cause severe burns in seconds. Spills create slippery floors. Pouring oil near flames or hot surfaces can flare up. Without training and the right gear, staff may spill during draining, get burned while transferring, leave slip hazards, or store oil in ways that raise fire or contamination risks.
Train staff to wear PPE every time. Teach them to let oil cool before moving it (below 120°F), and to use funnels, pumps, or caddies. Make it clear: never carry full containers of hot oil by hand-use carts. Clean any spills right away. Remind everyone never to pour oil down drains, which causes clogs and breaks FOG rules. Good training protects people and helps keep used oil clean for recycling.
Assigning Roles and Scheduling Responsibilities
Oil care is a team job. Assign clear roles and set a schedule. Outline who drains fryers, when oil cools, when to filter, how to transfer, and how to report and clean spills. Plan pickup times so bins don’t overflow.
Train all team members on the SOP. Make sure new hires learn oil handling in their first week. Post wall charts, checklists, or short videos to reinforce steps. Clear ownership and simple routines lead to steady execution, better safety, and smoother operations.
Calculating Fry-Oil Savings: Key Metrics for Kitchens
What you track, you can manage. Measuring fry-oil savings proves the value of better habits and guides smarter decisions. With the right numbers, you can show gains, spot weak points, and support spending on better tools or training.
When you track usage and costs over time, you can see the payoff from better oil care and build a strong case to keep improving.
Estimating Oil Cost Savings from Conservation Methods
Less oil used means lower spend-simple and powerful. With price swings, gear that needs less oil or keeps oil alive longer can lower overhead by a lot. A solid filtration setup alone can cut oil purchases by 50% or more. To measure savings, record your baseline oil use and cost before changes.
After you roll out new methods, track how many fewer jugs you buy. The drop in spend over the same time frame shows direct savings. Add indirect gains: fewer disposals, fewer returns from poor quality, and fewer complaints. Use fry-oil savings calculators to plug in fryer size and oil cost to forecast annual savings. Turning results into numbers makes the impact clear.
Tracking Oil Usage and Waste Reduction Over Time
Commit to tracking. Key data points include:
- Fresh oil purchased (by fryer or total)
- Oil change frequency per fryer
- Used oil volume hauled away
- Average oil days/hours between changes
- Food types fried and filtration schedule
Watch trends. If a new filter system is installed, look for fewer changes and fewer purchases. If oil life drops suddenly, check equipment, training, or routines. With steady tracking, you can tune your process, cut waste, and lift performance over time.
Frequently Asked Questions about Saving Fry-Oil
Even with clear routines, questions come up. The answers below highlight common issues and quick fixes to help teams keep oil cleaner for longer.
Use these tips to pick the right methods, set smart filter schedules, and avoid common mistakes that shorten oil life.
What are the most effective ways to extend fry-oil lifespan?
Use several methods together:
- Filtration: Skim during service and filter on a set schedule. Automated systems provide steady, thorough results.
- Temperature control: Cook between 350°F (175°C) and 375°F (190°C). Lower to around 250-280°F during slow times.
- Reduce contamination: Thaw and dry frozen foods, season away from the vat, and fill baskets away from the fryer.
- Storage: Keep fresh and used oil in sealed, non-reactive containers, away from heat and light.
How often should oil be filtered or replaced in high-volume kitchens?
High-volume operations need frequent attention. Skim throughout the day. Automated systems can filter during or between rushes. For manual setups, filter at least daily, and more often for heavy volumes or breaded items.
For changes, use test strips to guide timing. Also watch for dark color, bad smells, and heavy foaming. Plan changes before quality drops, not after guests complain.
What mistakes cause unnecessary fry-oil waste?
Common problems include:
- Weak filtration routines or skipping daily filtering
- Idle temps set too high
- Frying food with extra water (poor thawing), seasoning over the vat, or filling baskets over the oil
- Dirty vats and cool zones filled with burnt debris
- Storing oil in open, unsealed, or sunlit containers, or leaving soap residue after cleaning
Fixing these habits cuts waste and keeps oil in good shape longer.
Final Thoughts on Sustainable Fry-Oil Practices
Smart oil habits help kitchens save money, lower waste, and serve better food. These steps are now a core part of modern operations. The focus is simple: use every drop well and cut what you throw away.
Beyond lower purchasing and hauling costs, you get a cleaner, safer workplace with less smoke and odor. Strong disposal and recycling routines support CSR goals and appeal to guests who care about the planet. Used oil can fuel a circular economy when it’s turned into biofuel. Smarter frying helps businesses compete, cut impact, and build a stronger bottom line.